-xdebug -xnoagent -xrunjdwp:transport=dt_socket,address=8000,server=y,suspend=n -xrunjdwp jvm 加载 jdwp.dll transport=dt_socket 使用 socket 传输 address 表示调试端口号 server=y 表示 jvm 作为服务器,建立 socket suspend=n 表示启动过程中,jvm 不会挂起去等待调试客户端连接
components debugger interface / |-----------------------| / | vm | debuggee ----( |-----------------------| <------- jvmdi - java vm debug interface / | back-end | / |-----------------------| / | comm channel -( | <--------------- jdwp - java debug wire protocol / | |---------------------| | front-end | |---------------------| <------- jdi - java debug interface | ui | |---------------------|
com.sun.jdi com.sun.jdi.connect com.sun.jdi.event com.sun.jdi.request本文不对 jdi 进行深入阐述,这里重点介绍 jdi 中与断点相关的接口。
1 <html> 2 <head> 3 <title>hello example</title> 4 </head> 5 <body> 6 <%@ include file="greeting.jsp" %> 7 </body> 8 </html>
hello_jsp.java: 1 package org.apache.jsp; 2 3 import javax.servlet.*; 4 import javax.servlet.http.*; 5 import javax.servlet.jsp.*; 6 7 public final class hello_jsp extends org.apache.jasper.runtime.httpjspbase 8 implements org.apache.jasper.runtime.jspsourcedependent { 9 10 private static java.util.vector _jspx_dependants; 11 12 static { 13 _jspx_dependants = new java.util.vector(1); 14 _jspx_dependants.add("/greeting.jsp"); 15 } 16 17 public java.util.list getdependants() { 18 return _jspx_dependants; 19 } 20 21 public void _jspservice(httpservletrequest request, httpservletresponse response) 22 throws java.io.ioexception, servletexception { 23 24 jspfactory _jspxfactory = null; 25 pagecontext pagecontext = null; 26 httpsession session = null; 27 servletcontext application = null; 28 servletconfig config = null; 29 jspwriter out = null; 30 object page = this; 31 jspwriter _jspx_out = null; 32 33 34 try { 35 _jspxfactory = jspfactory.getdefaultfactory(); 36 response.setcontenttype("text/html"); 37 pagecontext = _jspxfactory.getpagecontext(this, request, response, 38 null, true, 8192, true); 39 application = pagecontext.getservletcontext(); 40 config = pagecontext.getservletconfig(); 41 session = pagecontext.getsession(); 42 out = pagecontext.getout(); 43 _jspx_out = out; 44 45 out.write("<html> /r/n"); 46 out.write("<head> /r/n"); 47 out.write("<title>hello example"); 48 out.write("</title> /r/n"); 49 out.write("</head> /r/n"); 50 out.write("<body> /r/n"); 51 out.write("hello there!"); 52 out.write("<p> /r/ngoodbye on "); 53 out.write(string.valueof( new java.util.date() )); 54 out.write(" /r/n"); 55 out.write(" /r/n"); 56 out.write("</body> /r/n"); 57 out.write("</html> /r/n"); 58 } catch (throwable t) { 59 if (!(t instanceof javax.servlet.jsp.skippageexception)){ 60 out = _jspx_out; 61 if (out != null && out.getbuffersize() != 0) 62 out.clearbuffer(); 63 if (pagecontext != null) pagecontext.handlepageexception(t); 64 } 65 } finally { 66 if (_jspxfactory != null) _jspxfactory.releasepagecontext ( pagecontext); 67 } 68 } 69 }sourcedebugextension_attribute { u2 attribute_name_index; u4 attribute_length; u1 debug_extension[attribute_length]; } public static void main(string[] args) throws exception{ string[]files = { "e://tomcat5_0_5//work//catalina//localhost//_//org//apache//jsp//hello_jsp.class", }; for(int k = 0; k < files.length; k++){ string file = files[k]; system.out.println("class : " + file); classfile classfile = new classfile(new datainputstream(new fileinputstream(file))); attributeinfo attributeinfo = classfile.getattribute("sourcedebugextension"); system.out.println("attribute name :" + attributeinfo.getname() + "]/n/n"); byte[]bytes = attributeinfo.get(); string str = new string(bytes); system.out.println(str); } } smap e:/tomcat5_0_5/work/catalina/localhost/_/org/apache/jsp/hello_jsp.java jsp *s jsp *f + 0 hello.jsp /hello.jsp + 1 greeting.jsp /greeting.jsp *l 1:45 2:46 3:47 3:48 4:49 5:50 1#1:51 1:52 2:53 7#0:56 8:57 *e
1:45 2:46 3:47 3:48 4:49 5:50(没有源文件代号,默认为hello.jsp) 开始行号 结束行号 hello.jsp: 1 -> hello_jsp.java: 45 2 -> 46 3 -> 47 48 4 -> 49 5 -> 50 1#1:51 1:52 2:53(1#1表示 greeting.jsp 的第1行) greeting.jsp: 1 -> hello_jsp.java: 51 52 2 -> 53 7#0:56 8:57(7#0表示 hello.jsp 的第7行) hello.jsp: 7 -> hello_jsp.java: 56 8 -> 57
public class managebreakpointruleractiondelegate extends abstractruleractiondelegate{ protected iaction createaction(itexteditor editor, iverticalrulerinfo rulerinfo) { return new managebreakpointruleraction(rulerinfo, editor); } } <extension point="org.eclipse.ui.editoractions"> <editorcontribution targetid="com.jiaoly.editors.jspeditor" id="com.jiaoly.debug.managebreakpointruleractiondelegate"> <action label="添加/删除断点" class="com.jiaoly.debug.managebreakpointruleractiondelegate" actionid="rulerdoubleclick" id="com.jiaoly.debug.managebreakpointruleractiondelegate"> </action> </editorcontribution> </extension>
<extension point="org.eclipse.ui.popupmenus"> <viewercontribution targetid="#textrulercontext" id="com.jiaoly.debug.managebreakpointruleractiondelegate"> <action label="添加/删除断点" class="com.jiaoly.debug.managebreakpointruleractiondelegate" menubarpath="addition" id="com.jiaoly.debug.managebreakpointruleractiondelegate"> </action> </viewercontribution> </extension>
public class managebreakpointruleraction extends action implements iupdate{ private iverticalrulerinfo rulerinfo; private itexteditor texteditor; private string bpmarkertype ; //当点marker的类型 private list allmarkers; //当前鼠标点击行所有的marker private string addbp; //action 的显示名称 public managebreakpointruleraction(iverticalrulerinfo ruler, itexteditor editor){ this.rulerinfo = ruler; this.texteditor = editor; bpmarkertype = ibreakpoint.breakpoint_marker; addbp = "添加/删除断点"; //$non-nls-1$ settext(this.addbp); } public void update() { this.allmarkers = this.fetchbpmarkerlist(); } public void run(){ if(this.allmarkers.isempty()) this.addmarker(); else this.removemarkers(this.allmarkers); } } managebreakpointruleraction.update() line: 55 managebreakpointruleractiondelegate(abstractruleractiondelegate).update() line: 114 managebreakpointruleractiondelegate(abstractruleractiondelegate).mousedown(mouseevent) line: 139
protected void addmarker() { ieditorinput editorinput= this.gettexteditor().geteditorinput(); idocument document= this.getdocument(); //the line number of the last mouse button activity int rulerline= this.getrulerinfo().getlineoflastmousebuttonactivity(); try{ int linenum = rulerline + 1; if(linenum > 0){ //returns a description of the specified line iregion iregion = document.getlineinformation(linenum - 1); int charstart = iregion.getoffset(); int charend = (charstart + iregion.getlength()) - 1; jspdebugutility.createjsplinebreakpoint(this.getresource(), linenum, charstart, charend); } }catch(coreexception coreexception){ coreexception.printstacktrace(); } catch(badlocationexception badlocationexception){ badlocationexception.printstacktrace(); } } public class jspbreakpoint extends javastratumlinebreakpoint { public jspbreakpoint(iresource resource, string stratum, string sourcename, string sourcepath, string classnamepattern, int linenumber, int charstart, int charend, int hitcount, boolean register, map attributes) throws debugexception { super(resource, stratum, sourcename, sourcepath, classnamepattern, linenumber, charstart, charend, hitcount, register, attributes); } } iworkspacerunnable wr= new iworkspacerunnable() { public void run(iprogressmonitor monitor) throws coreexception { // create the marker setmarker(resource.createmarker(markertype)); // modify pattern string pattern = classnamepattern; if (pattern != null && pattern.length() == 0) { pattern = null; } // add attributes addlinebreakpointattributes(attributes, getmodelidentifier(), true, linenumber, charstart, charend); addstratumpatternandhitcount(attributes, stratum, sourcename, sourcepath, pattern, hitcount); // set attributes ensuremarker().setattributes(attributes); register(register); } }; run(null, wr); protected void register(boolean register) throws coreexception { if (register) { debugplugin.getdefault().getbreakpointmanager().addbreakpoint(this); } else { setregistered(false); } } breakpointmanager = debugplugin.getdefault().getbreakpointmanager(); ibreakpoint breakpoint = breakpointmanager.getbreakpoint(imarker); breakpointmanager.removebreakpoint(breakpoint, true);
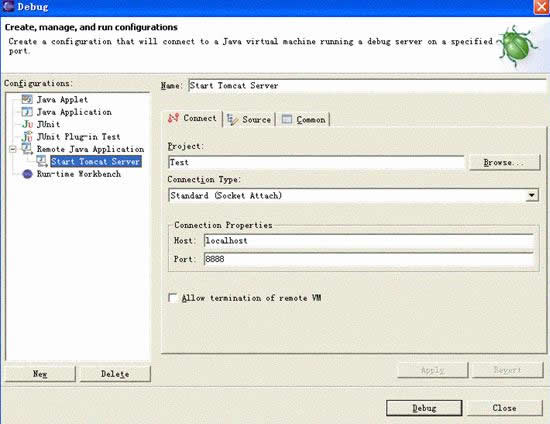
public void addtotarget(jdidebugtarget target) throws coreexception { imarker marker = this.getmarker(); iresource resource = marker.getresource(); string targetstring = target.getlaunch().getlaunchconfiguration().getname(); ijspnameutil util = jspdebugutility.getjspnameutil(targetstring); // pre-notification fireadding(target); string referencetypename; try { referencetypename = getpattern(); //如果没有设置 pattern, 根据 server 的类型, 产生新的 pattern if(referencetypename == null || "".equals(referencetypename.trim()) || "*".equals(referencetypename.trim())){ referencetypename = util.referencetypename(resource); } } catch (coreexception e) { jdidebugplugin.log(e); return; } this.ensuremarker().setattribute(type_name, referencetypename); string sourcepath = util.sourcepath(resource); this.ensuremarker().setattribute(jspbreakpoint.source_path, sourcepath); string classpreparetypename= referencetypename; //如果这时 class 还没有被加载, 注册一个 classpreparerequest 请求 // //当 class 加载的时候, 首先会触发 javabreakpoint 的 handleclassprepareevent 方法 //调用 createrequest(target, event.referencetype()) --> newrequest() --> // createlinebreakpointrequest() 创建 enable或disable 断点的请求 // // 设置 enable/disable 动作在 configurerequest() --> updateenabledstate(request) 方法中 // 根据 getmarker().getattribute(enabled, false) 确定断点是否有效 registerrequest(target.createclasspreparerequest(classpreparetypename), target); // create breakpoint requests for each class currently loaded virtualmachine vm = target.getvm(); if (vm == null) { target.requestfailed("unable_to_add_breakpoint_-_vm_disconnected._1"), null); } list classes = null; try { classes= vm.allclasses(); } catch (runtimeexception e) { target.targetrequestfailed("javapatternbreakpoint.0"), e); } if (classes != null) { iterator iter = classes.iterator(); while (iter.hasnext()) { referencetype type= (referencetype)iter.next(); if (installablereferencetype(type, target)) { createrequest(target, type); } } } } d:/j2sdk1.4.2/bin/java -xdebug -xnoagent -xrunjdwp:transport=dt_socket,address=8888,server=y,
suspend=n -djava.endorsed.dirs="../common/endorsed" -classpath "d:/j2sdk1.4.2/lib/tools.jar;../bin/bootstrap.jar" -dcatalina.base=".." -dcatalina.home=".." -djava.io.tmpdir="../temp" org.apache.catalina.startup.bootstrap start
<jspattributes xmi:id="jspattribute_0" name="keepgenerated" value="true"/> <jspattributes xmi:id="jspattribute_1" name="createdebugclassfiles" value="true"/> <jspattributes xmi:id="jspattribute_2" name="debugenabled" value="true"/>
新闻热点


疑难解答