使用OpenCV's Haar cascades作为人脸检测,因为他做好了库,我们只管使用。
代码简单,除去注释,总共有效代码只有10多行。
所谓库就是一个检测人脸的xml 文件,可以网上查找,下面是一个地址:
https://github.com/opencv/opencv/blob/master/data/haarcascades/haarcascade_frontalface_default.xml
如何构造这个库,学习完本文后可以参考:
http://note.sonots.com/SciSoftware/haartraining.html
https://www.instructables.com/id/Create-OpenCV-Image-Classifiers-Using-Python/
知道构造库,就可以检测各种你想要检测的东西了。
人脸检测不是人脸识别,但是人脸识别的前提。
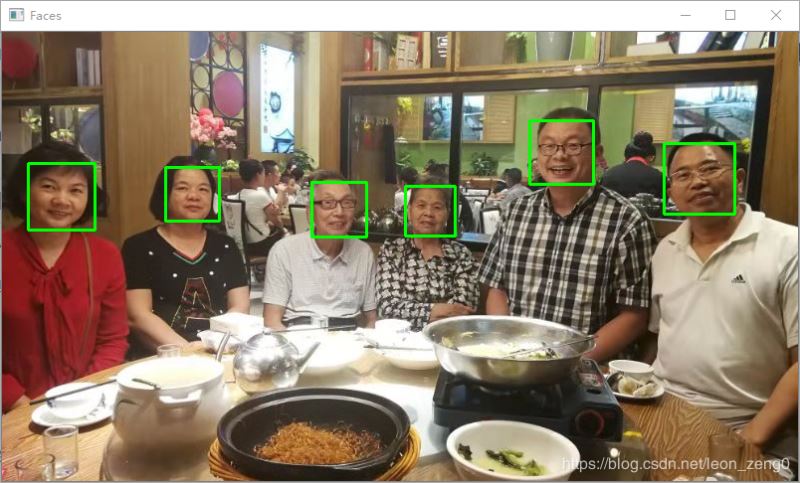
运行效果如下:
前提:
这个原始代码来自 https://www.pyimagesearch.com/2016/11/21/raspbian-opencv-pre-configured-and-pre-installed/ 的一个教学讲稿。
你需要下载haarcascade_frontalface_default.xml 以及准备你要检测的文件,我这里是family.jpg,放在python 文件detect_faces.py 所在目录(工作目录)的子目录images下。haarcascade_frontalface_default.xml是放在工作目录。
如果加上摄像头连接程序,也可实时检测,另文介绍。
代码1介绍
导入库,并做命令行参数处理。你在命令行可以输入如下:
python detect_faces.py --image image/family.jpg --detector haarcascade_frontalface_default.xml
我在程序中都有缺省参数处理,你如果集成测试或命令行不输参数的话,就要修改好你的缺省值。
这样命令行就是python detect_faces.py ,同时也可以输入命令行输入参数。
# USAGE 使用方法是:# python detect_faces.py --image images/family.jpg /# --detector haarcascade_frontalface_default.xml# import the necessary packages 输入包# import imutils import argparseimport cv2# construct the argument parser and parse the arguments //构造命令行参数分析# 为了集成测试,或者命令行输入的简单,这里都有缺省参数#image 是 images/family.jpg#detector 是 haarcascade_frontalface_default.xmlap = argparse.ArgumentParser()ap.add_argument("-i", "--image", default='images/family.jpg', help="path to the input image")ap.add_argument("-d", "--detector", default='haarcascade_frontalface_default.xml', help="path to Haar cacscade face detector")args = vars(ap.parse_args()) 导入图形文件,并灰度处理# load our image and convert it to grayscale 导入图形文件,并灰度化image = cv2.imread(args["image"])#image =imutils.resize(image,width=800)gray = cv2.cvtColor(image, cv2.COLOR_BGR2GRAY)导入检测文件,检测图中人脸,显示检测到的人脸数# load the face detector and detect faces in the image# 导入脸部检测文件detector = cv2.CascadeClassifier(args["detector"])#检测图形中的脸部rects = detector.detectMultiScale(gray, scaleFactor=1.05, minNeighbors=9, minSize=(40, 40), flags=cv2.CASCADE_SCALE_IMAGE)#显示检测到的人脸数目print("[INFO] detected {} faces".format(len(rects))) 循环,绘图每个检测到的人脸框,并图形显示# load the face detector and detect faces in the image# 导入脸部检测detector = cv2.CascadeClassifier(args["detector"])#检测图形中的脸部rects = detector.detectMultiScale(gray, scaleFactor=1.05, minNeighbors=9, minSize=(40, 40), flags=cv2.CASCADE_SCALE_IMAGE)#显示检测到的人脸数目print("[INFO] detected {} faces".format(len(rects)))
新闻热点


疑难解答