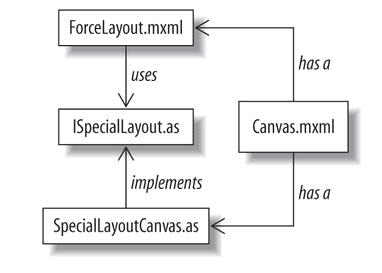
首页 > 设计 > WEB开发 > 正文

3.24.手动布局容器

2023-08-08 22:33:06
字体:
来源:转载
供稿:网友
3.24.1 问题
你需要根据类型以及类型的属性来布置容器的子组件。
3.24.2 解决办法
覆盖UIComponent 的updateDisplayList 方法来移动子组件。
3.24.3 讨论
要在任何Container 或者UIComponent 对象内覆盖任何布局或设置大小的逻辑,只要覆盖updateDisplayList 方法并在super.updateDisplayList分方法之后插入你自己的布局逻辑即可。本节专注于如何通过使用子组件的自定义的属性来决定Hbox 子组件的布局。这个例子由4 个文件组成,三个类和一个接口,它们各司其职并拥有自己独有的属性。大致的UML图(图Figure 3-1)描述了它们之间的关系。

Figure 3-1. Relationships between containers and interfaces

Canvas.mxml 文件内添加了ForceLayout 组件并提供其子组件。ForceLayout 组件可以包含任何子组件,但如果子组件实现了IspecialLayout 接口,ForceLayout 组件将会根据此类子组件是否被选中来进行不同的布局。SpecialLayoutCanvas 定义了简单的方法来决是否被选中。

首先,看一下SpecialLayoutCanvas.as 文件:
+展开
-ActionScript
package oreilly.cookbook
{
import mx.containers.Canvas;
import mx.controls.Label;
import mx.core.UIComponent;
import flash.events.MouseEvent;
public class SpecialLayoutCanvas extends Canvas implements
ISpecialLayout
{
private var titlelabel:Label;
private var selectedlabel:Label;
private var _isSelected:Boolean = false;
public function SpecialLayoutCanvas()
{
super();
titlelabel = new Label();
addChild(titlelabel);
titlelabel.text = "Label";
this.addEventListener(MouseEvent.MOUSE_DOWN,
setIsSelected);
minHeight = 45;
minWidth = 80;
selectedlabel = new Label();
//addChild(selectedlabel);
selectedlabel.text = "Selected";
}
private function setIsSelected(mouseEvent:MouseEvent):void
{
_isSelected ? isSelected = false : isSelected = true;
}
public function set isSelected(value:Boolean):void
{
_isSelected = value;
if(isSelected)
{
addChild(selectedlabel);
selectedlabel.y = 30;
}e
else
{
try{
removeChild(selectedlabel);
}catch(err:Error){}
}i
if(parent != null)
{
(parent as UIComponent).invalidateDisplayList();
}
}
public function get isSelected():Boolean
{
return _isSelected;
}
}
}

这个类使用getter 和setter 方法简单地定义了一个selected 属性,并且当对象被选中的时候给其添加一个标签,反之删除这个标签。

下一步,我们来看ForceLayout 组件,它读取所有的子组件来判别它们中是否有继承IspecialLayout 接口的,如果有,是否选中了。
+展开
-ActionScript
package oreilly.cookbook
{
import mx.core.EdgeMetrics;
import mx.core.UIComponent;
import mx.containers.VBox;
import mx.containers.Panel;
import mx.containers.Canvas;
import flash.display.DisplayObject;
public class ForceLayout extends VBox
{
public var gap:Number;
public function ForceLayout()
{
super();
}

无论何时,只要该组件需要重绘的时候,Flex 框架即调用updateDisplayList 方法。因为重绘的时候组件需要做的一件事情是重新调整所有子组件的位置,所有调整位置的逻辑都在这里实现:
+展开
-ActionScript
override protected function
updateDisplayList(unscaledWidth:Number,
unscaledHeight:Number):void
{
super.updateDisplayList(unscaledWidth, unscaledHeight);
var yPos:Number = unscaledHeight;
// Temp variable for a container child.
var child:UIComponent;
var i:int = 0;
while(i<this.numChildren)
{
// Get the first container child.
child = UIComponent(getChildAt(i));
// Determine the y coordinate of the child.
yPos = yPos - child.height;
// Set the x and y coordinate of the child.
// Note that you do not change the x coordinate.
if(child is ISpecialLayout)
{
if((child as ISpecialLayout).isSelected)
{
yPos -= 20;
child.move(child.x, yPos);
yPos -= 20;
}e
else
{
child.move(child.x, yPos);
}
}e
else
{
child.move(child.x, yPos);
// Save the y
coordinate of the child,
// plus the vertical gap between children.
// This is used to calculate the coordinate
// of the next child.
yPos = yPos - gap;
i++;
}i
= 0;
var amountToCenter:Number = yPos / 2;
while(i<this.numChildren)
{
getChildAt(i).y -= amountToCenter;
i++;
}
}
}
}

最后的清单将两个组件付诸使用,将ForceLayout 容器添加到Canvas 并且添加SpecialLayoutCanvas 子组件。注意,如果它们是当前存在的,仅仅改变布局即可,不需要任何特别属性,任何类型子组件都可以添加到ForceLayoutCanvas,并且实际上所有实现了IspecialLayout 接口的子组件都是可用的。
+展开
-XML
<mx:Canvas xmlns:mx="http://www.adobe.com/2006/mxmlwidth="800"
height="600xmlns:cookbook="oreilly.cookbook.*">

<cookbook:ForceLayout width="400height="500"
backgroundColor="#ffffff">

<mx:HBox>
<mx:Button label="button"/>
<mx:LinkButton label="link"/>
</mx:HBox>
<cookbook:SpecialLayoutCanvas isSelected="false"
backgroundColor="#c0c0cc"/>

<mx:HBox>
<mx:Button label="button"/>
<mx:LinkButton label="link"/>
</mx:HBox>
<cookbook:SpecialLayoutCanvas isSelected="false"
backgroundColor="#ccc0c0"/>

<cookbook:SpecialLayoutCanvas isSelected="true"
backgroundColor="#cc00cc"/>

<cookbook:SpecialLayoutCanvas isSelected="false"
backgroundColor="#ccc0c0"/>

</cookbook:ForceLayout>
</mx:Canvas>
发表评论 共有条评论
用户名: 密码:
验证码: 匿名发表